Screenshots of a DVD with ffmpeg
08 Feb 2008I’ve been playing around a lot with video conversion lately and one of the tools I use often is the Swiss armyknife for video manipulation ‘ffmpeg‘. It does format conversion (MPEG1/2/4, Quicktime, AVI …) , rescaling, recompressing, frame rate conversion … almost everything. It exists for all flavours of Linux/Unix, and also for Windows.
To give you an example: this is a script I wrote to extract screenshots of DVD files, straight from the disk.
1) the naive version
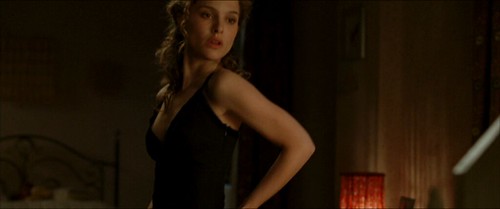
ffmpeg -i [input file] -r .05 -y [output name]%%03d.png
This does indeed extract a PNG image every 20 seconds (framerate = 0.05), but it does not take into account that the DVD image material is stored anamorphically. What you get is this:

Natalie Portman looks really thin, but that’s because the image dimensions (720×576 pixels – PAL standard) are for 5:4 aspect ratio, and whereas the actual image should be 16:9. So let’s make the image wider while keeping it the same height.
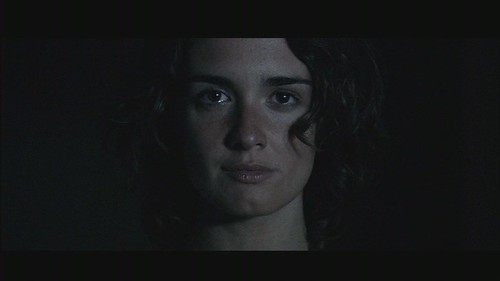
2) Rescale to 16:9
ffmpeg -i [input file] -r .05 -s 1024x576 -y [output name]%%03d.png
The result looks better:

As you see, there are still black borders on the top and bottom. This is because a feature film is made in ‘scope’ format, with an aspect ratio of 2.39 instead of 1.78 (the decimal equivalent of 16/9). So, while the full width of the image is used, only 428 pixels of the height are actually in use. Let’s crop those black borders off.
3) Crop black borders away
ffmpeg -i [input file] -r .05 -croptop 74 -cropbottom 74 -s 1024x428 -y [output name]%%03d.png
4) old 4:3 movies
The older movies used a 4:3 aspect ratio, so when you extract them as 16:9 they look like a weight fell on them:
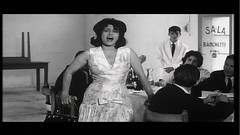
In those cases, you can use the ‘naive’ version above, which will give you:

Here also, the actual 4:3 image is ‘letterboxed’ to the 5:4 DVD image.
Why did I need to figure this out? Well, guess what movie is running on my LCD photo frame:
Windows batch script
For those who like a ready-made script (for Windows machines), here it goes:
set FFMPEG=<path>/ffmpeg.exe<br />
set SOURCE=e:\video_ts<br />
set TITLE=[movie name]<br />
set DESTIN=%CD%
```pushd %SOURCE%
for %%F in (*.VOB) do (
call :vob2img %%F
)
popd
goto :end
:vob2img
set FNAME=%1
set NAME=%FNAME:.VOB=%
set NAME=%NAME:VTS_=%
set NAME=%NAME:01=%
set NAME=%NAME:_TS=%
set NAME=%NAME:VIDEO=%
set ROOT=%TITLE%%NAME%
“%FFMPEG%” -i %FNAME% -r .05 -croptop 74 -cropbottom 74 -s 1024x428 -y %DESTIN%%ROOT%.%%03d.png
:end`
Which will give, for a 90 minute movie, 270 images called like V4Vendetta_1.NNN.png.